Jobs Jobs Jobs Jobs Jobs Jobs Jobs Jobs Jobs Jobs Jobs Jobs Jobs Jobs Jobs Jobs Jobs Jobs Jobs Jobs Jobs Jobs Jobs Jobs Jobs Jobs Jobs Jobs Jobs Jobs Jobs Jobs Jobs Jobs Jobs Jobs Jobs Jobs Jobs Jobs Jobs Jobs Jobs Jobs Jobs Jobs Jobs Jobs Jobs Jobs Jobs Jobs Jobs Jobs Jobs Jobs Jobs Jobs Jobs Jobs Jobs Jobs Jobs Jobs Jobs Jobs Jobs Jobs Jobs Jobs Jobs

Current - JObs 

         Customer Support Representative ( 0 - 2 yrs)

Job –Type:
Customer Support Representative (voice)
Shift Type:
General (Female)
CCT:
Freshers(10,000  to 14,000)- 
Experienced ( 14,000 to 18,000)
Work Location
Rajajinagar , M. G Road
Travel allowance
NO
Shift Type
9.30 to 6.00 pm (female)
7.30 to 4.30 pm --   4.30 to 11.00 pm
Languages Known:
Kannada , English 
Note: Good at English
Process Type:Inbound (voice)
Experience 1 to  2 yrs.
                Team - Leader ( Inbound Voice) Day - Shift
Job –Type:
Team Leader ( Inbound  Voice Process)
Shift Type:
9.30 to 6.00 pm (female)
7.30 to 4.30 pm --   4.30 to 11.00 pm
CCT:
4,00,000 Laks
Work Location
Rajajinagar
 allowance
Food + Transport
Languages Known:
Kannada , English 
Note: Good at English
Descption:-
Excell knowledge
Inbound  Voice
Experience: 1.5 to 6 yrs.
Shrinkage
Customer Problem Solving Skills
Team Management Skills
Job –Type:
Network Field Engineer
Shift Type:
Day Shift
CCT:
14,000
Work Locations

 allowance
Bike + Phone
Languages
 English + Kannada
Description:-
Hardware and networking knowledge
Bike (Must)
Day-shift
Immediate Joining
Job –Type:
Technical Support Representative
Shift Type:
Rotational
CCT:
2 lakhs
Work Location
WhiteField
 allowance
Transport
Languages
 English
Description:-
Excell knowledge
outbound  Voice
Experience: 0 yrs
Process: Chat
Good at written Skills

               ALL THE BEST For your Career by Victorysolutions
contact: 9008250605

E- Mail mistakes

Mistake 1: Using the Wrong Tone

You might be tempted to send emails quickly when you're in a rush, without thinking carefully about your audience, what you're saying, or how your message might come across. So, it's important to consider who you're "talking" to and what action you want them to take, before you start writing.
For example, an email to a senior manager should be more formal than a quick update to a team member, and a message to a customer will likely be more enthusiastic and polite than an exchange with a close colleague.
Although your email's subject matter may be clear to you, its recipient might not share your knowledge or understanding. So, avoid using abbreviations, jargon or "text speak," and consider whether your message is appropriate before you hit the send button. Will your reader understand what you're saying? And is your information clearly structured and presented?
A good rule to follow is to address people in an email as you would in person. For example, making a quick request or providing instructions without a "hello" or "thank you" will likely come across as rude, regardless of how busy you are. So, make sure that all of your emails are courteous and respectful, and avoid typing in capitals, which implies anger or aggression.

Mistake 2: Hitting "Reply All"

How often have you been copied into an email exchange that's not relevant to you, and doesn't require you to take any action? Chances are, it happens regularly, and you know how frustrating it can be.
"Reply all" is a useful tool for keeping multiple team members in the loop, or for documenting group decisions, but many people use it without considering who should actually receive their email.
Receiving numerous irrelevant emails throughout the day can be distracting and time consuming; and becoming known as the person who always hits "reply all" can potentially damage your reputation, as it can appear thoughtless, rushed and unprofessional. It might also suggest that you're not confident making decisions without input from senior managers.
So, consider whether you should "reply all" or respond only to the email's sender. And, think about whether using "cc" (carbon copy) or "bcc" (blind carbon copy) to include selected team members is more appropriate.

Mistake 3: Writing Too Much

Brief and succinct emails that contain only the important details are much more effective than long or wordy ones.
If you're struggling to keep your message short, consider whether the subject matter is too complex. Would another way of communicating it be more effective? Would a face-to-face meeting or telephone call make it clearer? Should you put your information in a procedure document instead?

Mistake 4: Forgetting Something?

How many times have you sent an email without attaching the relevant document? Perhaps you included a link that didn't work? Or even attached the wrong file?
These mistakes can often be fixed quickly with a follow-up email, but this adds to the large volume of messages that people receive, and it can appear unprofessional or forgetful. Consider attaching files as soon as your start drafting your message, and always check all of your links carefully.
Attaching the wrong document can be much more serious, particularly if it's sensitive or restricted. Read our article on confidentiality in the workplace to identify what information is confidential in your organization, and to think about how to protect your data.

Mistake 5: Emailing the Wrong Person

Today, email providers increasingly use "auto-fill," predictive text and "threads" (or "conversation view"), which can all increase the risk of you sending your message to the wrong person.
This can be embarrassing, but it also means that your email might not reach its intended recipient unless someone flags up your mistake. More seriously, you risk distributing sensitive information to the wrong people, and damaging your organization's reputation. So, always pause to review your email before you send it.
When you reply to or forward an email within a thread, make sure that all the messages contained within it are appropriate for the recipient. Is there any sensitive information? Are there any personal comments or remarks?

Mistake 6: Being Too Emotional

One of the main benefits of email is that you don't need to respond immediately. It's particularly important to delay your response when you're stressed, angry or upset – if you send a message in the heat of the moment, you can't get it back (although some email clients do have a limited "undo" or "retrieve" option). These emails could damage your working relationships, or even be used as evidence against you.
So, avoid sending any messages when you feel this way. Wait until you've calmed down and can think clearly and rationally.

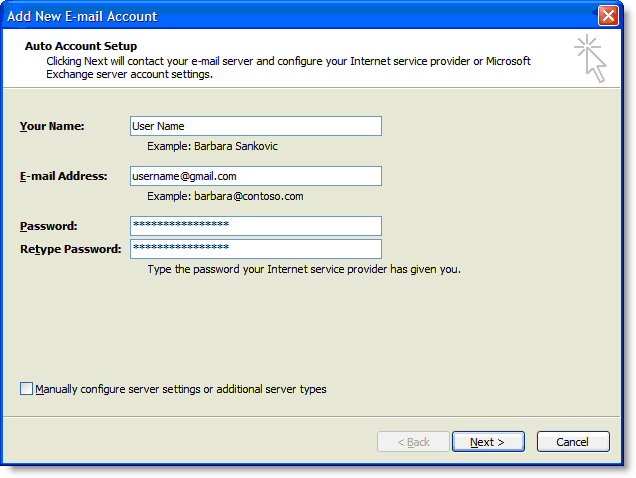
configure Outlook 2007 for your Gmail address


configure Outlook 2007 for your Gmail address:

  1. Enable POP in your email account. Don't forget to click Save Changes when you're one.Open Outlook.
  2. Click the Tools menu, and select Account Settings...
  3. On the E-mail tab, click New...
  4. If you are prompted to Choose E-mail Service, select Microsoft ExchangePOP3IMAP, orHTTP, and click Next.
  5. Fill in all necessary fields to include the following information:
  6. Your Name: Enter your name as you would like it to appear in the From: field of outgoing messages.
    Email Address: Enter your full Gmail email address (username@gmail.com). Google Apps users, enter your full address in the format username@your_domain.com.
    Password: Enter your email password.
    Manually configure server settings or additional server types: Leave this option unchecked if you want to automatically configure Outlook 2007. If you want to manually configure Outlook 2007, check this box now. Google Apps users should configure manually as follows.
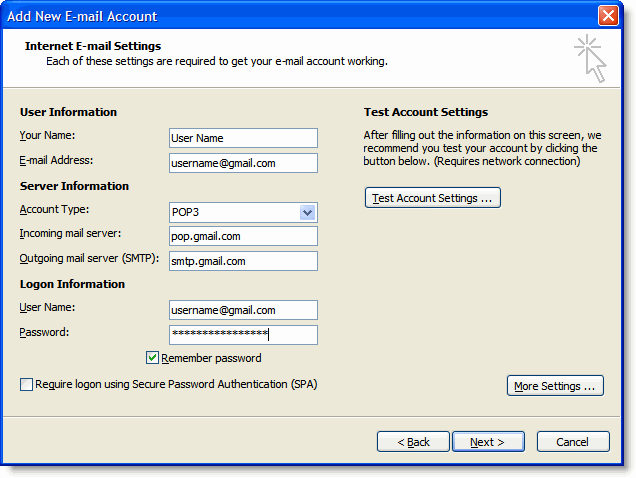
    Enter name, email address, and password
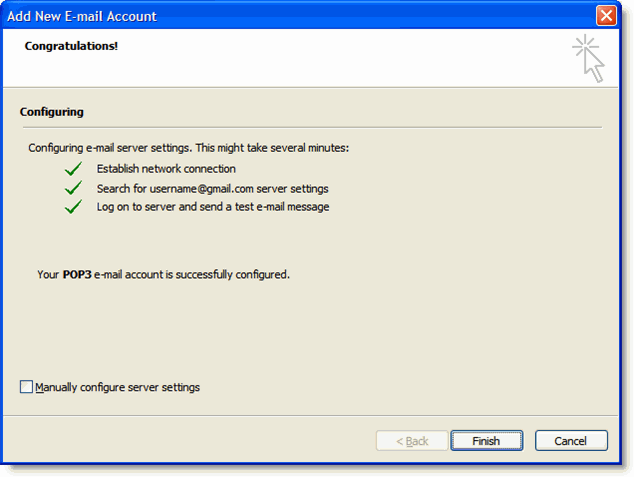
  7. Click Next. If you are configuring Outlook 2007 automatically, you're done! Just click Finish.
  8. Successful Configuration
  9. If you are configuring Outlook 2007 manually, select Internet E-mail and click Next.
  10. Verify your User Information, and enter the following additional information:
  11. Server Information
    Account Type: POP3
    Incoming mail server: pop.gmail.com (Google Apps users, enter the server names provided, don't add your domain name in these steps)
    Outgoing mail server (SMTP): smtp.gmail.com
    Logon Information
    User Name: Enter your Gmail username (including @gmail.com). Google Apps users, enter your full address in the format username@your_domain.com
    Password: Enter your email password.
    Require logon using Secure Password Authentication (SPA): Leave this option unchecked.
    Account Settings
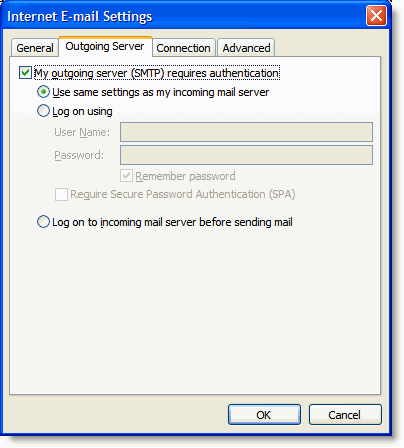
  12. Click the More Settings... button, and select the Outgoing Server tab.
  13. Check the box next to My outgoing server (SMTP) requires authentication and select Use same settings as my incoming mail server.
  14. Outgoing Server Tab
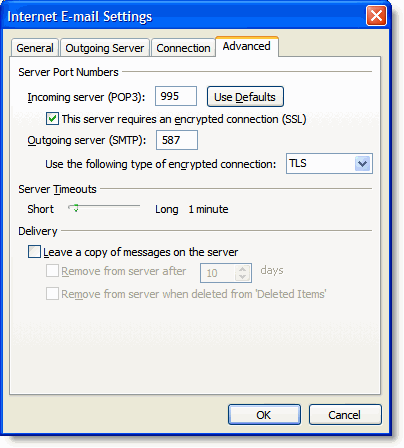
  15. Click the Advanced tab, and check the box next to This server requires an encrypted connection (SSL) under Incoming Server (POP3).
  16. In the Outgoing server (SMTP) box, enter 587, and select TLS from the drop-down menu next to Use the following type of encrypted connection:.
  17. Advanced Tab
  18. Click OK.
  19. Click Test Account Settings... After receiving 'Congratulations! All tests completed successfully', clickClose.
  20. Click Next, and then click Finish.

Set up Gmail To Connect With Microsoft Outlook

Set up Gmail To Connect With Microsoft Outlook

  1. Log into your Gmail Account.
  2. Click on the Gear icon and select Settings.
  3. Click on Forwarding and POP/IMAP on the links given above your Inbox
  4. Under POP Download, click to select Enable POP for all mail that arrives from now on.
  5. Select Archive Gmail’s Copy in the drop down box next to When Messages Are Accessed With POP
  6. Click on Save Changes
The above method sets up your Gmail account to let MS Outlook download messages through POP3 protocol. In case you wish to map the folders and access your Gmail messages through IMAP, proceed with steps 1 to 3 above and instead of selecting Enable POP, go to the IMAP Access and select Enable IMAP. NOTE: You should either select POP or IMAP but not both. Auto Configure MS Outlook. Once you are done with the above, you can make Microsoft Outlook to auto configure your account for you.
  1. From the File menu (Office button in Office 2007), select Add New Account
  2. Enter your email ID and password in the dialog box that appears
  3. Click on Next
  4. Microsoft Outlook will take few minutes to search for Gmail settings and will configure the account for you.
Note that if you selected POP in the Settings of Gmail above, you will get a POP3 account. Accordingly, if you have selected IMAP above, you get an IMAP account in Microsoft Outlook. If you wish to configure Microsoft Outlook manually for Gmail, here are the settings you will need to use. Settings To Configure MS Outlook Manually For Gmail

  1. From the File menu, select Add Account
  2. In the dialog box that appears, select Manually configure server settings or additional server types.
3. Click Next
4. Select Internet Email and again click Next
5. In the dialog box that appears, enter your name, email address and password in the related fields.
 
 
6. Under Account Type, select POP if you wish to create a POP3 account. For IMAP, select IMAP
7. For Incoming server, enter pop.gmail.com or imap.gmail.com depending upon the type of account you are creating.
8. For outgoing server, enter smtp.gmail.com
9. Click on More Settings
10. Under the Outgoing Server tab, click to select My Outgoing Server (SMTP) requires Authentication
11. Click to select Use Same Settings As My Incoming Server
12. Go to the Advanced Tab
13. Enter 995 in Incoming Server Port if you are creating a POP3 account. If you are creating IMAP, enter 993.
14, Click to select This Server Requires an Encrypted Connection. For IMAP account, set the type of encryption to SSL.
15. In the Outgoing Server Port, enter the value 587. Set the type of encryption to TLS
16. Click OK to close the dialog box.
17. Click Test Account Settings… to test the account settings
18. You should see a message saying your account settings are correct. Click on Next to exit the dialog box.

E-mail with Microsoft Outlook 2010 using POP3

Step 1
On your computer, click Start > Control Panel.
Step 2
If using Windows XP, double-click the Mail icon.Double-click the Mail icon
Double-click the Mail icon


If using Windows Vista, Windows 7 or above, type Mail into the search box at the top-right of the Control Panel window to quickly find the Mail icon. Then, double-click it. Search for Mail and double-click the icon
Search for Mail and double-click the icon
Step 3
Click the E-mail Accounts button. Click E-mail Accounts
Click E-mail Accounts
Step 4
Under the E-mail tab, click the New button to add your 1&1 e-mail account.
Select E-mail > New
Select E-mail > New
Step 5
Select Manually configure server settings or additional server types and then click theNext button.
Select Manually configure and click Next
Step 6
Select the Internet E-mail type of account and then click the Next button. Select Internet E-mail and click Next
Select Internet E-mail and click Next
Step 7
Enter the required information:
FieldData
Your NameThis is the name that will appear when others receive your e-mail
E-mail AddressYour 1&1 E-mail address
Account TypePOP3
Incoming mail serverpop.1and1.com
Outgoing mail server (SMTP)smtp.1and1.com
User NameYour 1&1 E-mail address
PasswordThe password for your 1&1 E-mail address
Then click the More Settings button to continue.
Enter the appropriate information and click More Settings
Step 8
Select the Outgoing Server tab from the top of the new window that opens.
Select Outgoing Server
Step 9
Check the box for My outgoing server (SMTP) requires authentication and ensure that Use same settings as my incoming mail server is selected.
Next, click the Advanced tab at the top of the window.
Check the boxes and click Advanced
Step 10
Enter port 995 as the Incoming server (POP3) port and ensure that SSL is chosen from theUse the following type of encrypted connection drop-down box.
Enter port 587 as the Outgoing server (SMTP) port and choose TLS from the drop-down box next to Use the following type of encrypted connection.
Click the OK button to save your settings.
Enter the information and click OK
Step 11
Click the Next button. Click Next
Click Next
Step 12
If the part of the test fails, go through the previous steps and double-check all of your settings in Outlook. If the test is successful, click the Close button. Click Close
Click Close
Step 13
Click the Finish button. Click Finish
Click Finish
Step 14
Click the Close button to close the Account Settings window. Click Close
Click Close
Step 15
Click the Close button to close the Mail Setup window. Click Close
Click Close
Step 16
You may now launch Outlook 2010 from the Start menu and begin writing and checking your mail!