“When the developing countries proposed, at the last major financing for
development conference earlier this year, to strengthen the tax
cooperation work at the United Nations by transforming its technical
committee on this issue into an intergovernmental organ, the developed
nations raged in opposition, leaving the Organisation for Economic
Co-operation and Development, an organization made up essentially of
developed countries, as the dominant agent of international tax
cooperation.
create password less for multiple non-root users in linux
You have to create a password less ssh connection between 3 Linux box for non root user i.e a normal user user1.
Pre-requisites
User user1 should exist on all the 3 Linux box
Server details
Login as user1
With the above command we have created a pair of public and private key using RSA type authentication.
Click the link to know more about RSA and DSA type of authentication
Now to create a password less ssh connection we need to copy id_rsa.pub to the remote server i.e server2 and server3
Using the above steps we have successfully created a password less authentication from
On server 2
Login as user1
Now to create a password less ssh connection we need to copy id_rsa.pub to the remote server i.e server 1 and server 3
Using the above steps we have successfully created a password less authentication from
Now to create a password less ssh connection we need to copy id_rsa.pub to the remote server i.e server 1 and server 2
Using the above steps we have successfully created a password less authentication from
Pre-requisites
User user1 should exist on all the 3 Linux box
Server details
server1.example
IP 192.168.1.6

server2.example
IP 192.168.1.11

server3.example
IP 192.168.1.12
Making password less connection from server1
On server 1Login as user1
[user1@server1 ~]$ ssh-keygen -t rsa
Generating public/private rsa key pair.
Enter file in which to save the key (/home/user1/.ssh/id_rsa):
Created directory '/home/user1/.ssh'.
Enter passphrase (empty for no passphrase): [Press ENTER for EMPTY password]
Enter same passphrase again: [Press ENTER for EMPTY password]
Your identification has been saved in /home/user1/.ssh/id_rsa.
Your public key has been saved in /home/user1/.ssh/id_rsa.pub.
The key fingerprint is:
81:bf:d5:03:3f:a1:a4:81:27:b5:61:e4:e6:17:b9:a0 user1@server1.example
The key's randomart image is:
+--[ RSA 2048]----+
|       .=        |
|       * o .     |
|      + O = .    |
|       B * B .   |
|      E S = =    |
|         +   o   |
|        .        |
|                 |
|                 |
+-----------------+
With the above command we have created a pair of public and private key using RSA type authentication.
Click the link to know more about RSA and DSA type of authentication
Now to create a password less ssh connection we need to copy id_rsa.pub to the remote server i.e server2 and server3
[user1@server1 ~]$ ssh-copy-id user1@server2
The authenticity of host 'server2 (192.168.1.11)' can't be established.
RSA key fingerprint is de:75:8a:ff:26:1b:b5:82:61:36:9c:44:d2:57:3c:9e.
Are you sure you want to continue connecting (yes/no)? yes
Warning: Permanently added 'server2,192.168.1.11' (RSA) to the list of known hosts.
user1@server2's password: [Give password for user1]
Now try logging into the machine, with "ssh 'user1@server2'", and check in:

  .ssh/authorized_keys

to make sure we haven't added extra keys that you weren't expecting.[user1@server1 ~]$ ssh-copy-id user1@server3
The authenticity of host 'server3 (192.168.1.12)' can't be established.
RSA key fingerprint is 98:61:fb:91:8b:10:29:e1:b2:db:fd:52:6d:79:d7:1a.
Are you sure you want to continue connecting (yes/no)? yes
Warning: Permanently added 'server3,192.168.1.12' (RSA) to the list of known hosts.
user1@server3's password: [Give password for user1]
Now try logging into the machine, with "ssh 'user1@server3'", and check in:
.ssh/authorized_keys
to make sure we haven't added extra keys that you weren't expecting.NOTE: Make sure the permission on authorized_keys is 600Using the above steps we have successfully created a password less authentication from
server 1 ------> server 2
server 1 ------> server 3
Making password less connection from Server 2
On server 2
Login as user1
[user1@server2 ~]$ ssh-keygen -t rsa
Generating public/private rsa key pair.
Enter file in which to save the key (/home/user1/.ssh/id_rsa):
Enter passphrase (empty for no passphrase): [Press ENTER for EMPTY password]
Enter same passphrase again: [Press ENTER for EMPTY password]
Your identification has been saved in /home/user1/.ssh/id_rsa.
Your public key has been saved in /home/user1/.ssh/id_rsa.pub.
The key fingerprint is:
8f:0d:bc:8c:fc:d1:38:1a:b3:be:7a:8d:fc:8d:0d:1e user1@server2.example
The key's randomart image is:
+--[ RSA 2048]----+
|                 |
|                 |
|                 |
|       .         |
|        S        |
|     . o O       |
|     .=oE +      |
|      +B.O       |
|    .+=o= o      |
+-----------------+[user1@server2 ~]$ ssh-copy-id user1@server1
The authenticity of host 'server1 (192.168.1.6)' can't be established.
RSA key fingerprint is b8:36:c1:38:01:db:cc:89:b1:a9:b8:f7:f7:a8:17:ef.
Are you sure you want to continue connecting (yes/no)? yes
Warning: Permanently added 'server1,192.168.1.6' (RSA) to the list of known hosts.
user1@server1's password: [Give password for user1]
Now try logging into the machine, with "ssh 'user1@server1'", and check in:
.ssh/authorized_keys
to make sure we haven't added extra keys that you weren't expecting.[user1@server2 ~]$ ssh-copy-id user1@server3
The authenticity of host 'server3 (192.168.1.12)' can't be established.
RSA key fingerprint is 98:61:fb:91:8b:10:29:e1:b2:db:fd:52:6d:79:d7:1a.
Are you sure you want to continue connecting (yes/no)? yes
Warning: Permanently added 'server3,192.168.1.12' (RSA) to the list of known hosts.
user1@server3's password: [Give password for user1]
Now try logging into the machine, with "ssh 'user1@server3'", and check in:
.ssh/authorized_keys
to make sure we haven't added extra keys that you weren't expecting.Using the above steps we have successfully created a password less authentication from
server 2 ------> server 1
server 2 ------> server 3
Making password less connection from Server 3
On server 3
Login as user1
[user1@server3 ~]$ ssh-keygen -t rsa
Generating public/private rsa key pair.
Enter file in which to save the key (/home/user1/.ssh/id_rsa):
Enter passphrase (empty for no passphrase): [Press ENTER for EMPTY password]
Enter same passphrase again: [Press ENTER for EMPTY password]
Your identification has been saved in /home/user1/.ssh/id_rsa.
Your public key has been saved in /home/user1/.ssh/id_rsa.pub.
The key fingerprint is:
5b:99:c5:84:02:fd:ea:95:b7:51:2e:e3:28:f3:9d:9d user1@server3.example
Now to create a password less ssh connection we need to copy id_rsa.pub to the remote server i.e server 1 and server 2
[user1@server3 ~]$ ssh-copy-id user1@server1
The authenticity of host 'server1 (192.168.1.6)' can't be established.
RSA key fingerprint is b8:36:c1:38:01:db:cc:89:b1:a9:b8:f7:f7:a8:17:ef.
Are you sure you want to continue connecting (yes/no)? yes
Warning: Permanently added 'server1,192.168.1.6' (RSA) to the list of known hosts.
user1@server1's password: [Give password for user1]
Now try logging into the machine, with "ssh 'user1@server1'", and check in:

  .ssh/authorized_keys

to make sure we haven't added extra keys that you weren't expecting.[user1@server3 ~]$ ssh-copy-id user1@server2
The authenticity of host 'server2 (192.168.1.11)' can't be established.
RSA key fingerprint is de:75:8a:ff:26:1b:b5:82:61:36:9c:44:d2:57:3c:9e.
Are you sure you want to continue connecting (yes/no)? yes
Warning: Permanently added 'server2,192.168.1.11' (RSA) to the list of known hosts.
user1@server2's password: [Give password for user1]
Now try logging into the machine, with "ssh 'user1@server2'", and check in:
.ssh/authorized_keys
to make sure we haven't added extra keys that you weren't expecting.Using the above steps we have successfully created a password less authentication from
server 3 ------> server 1
server 3 ------> server 2
IMPORTANT NOTE:
|
For creating password less ssh authentication between multiple Linux machine using normal users make sure the two permissions are implemented or else the password less ssh authentication won't work
Permission 600 on authorized_keys file and
Permission 700 on .ssh directory
|
port forwarding in linux
SSH supports a variety of ways of moving data across psuedo-VPN tunnel. One of the methods is Port Forwarding which creates a secure connection between a local computer and a remote machine through wich data can be transferred through an encrypted tunnel.
Types of Port Forwarding
There are 3 types of Port Forwarding which can be performed on Linux namely- Local
- Remote
- Dynamic
Features
- Tunneling support - psuedo-VPN for moving data
- Tunnels local port(s) to remote systems for use by local system users
- SSHD binds to a local port and provides access to a remote port
- Default port forwarding binds to loopback addresses for IPv4(127.0.0.1) and IPv6(::1)
- Ability to forward local ports to destination server via a third server.
Lets suppose we want to protect to access of telnet daemon on machine1. Since telnet is controlled by xinetd so we will force telnet to instead of binding to all IP addresses on all network interfaces only to bind to local loopback address.
Make sure you have telnet-server installed
# rpm -qa | grep telnet-serverIf not you can install using yum
# yum -y install telnet-serverNext lets bind telnet to loopback address (on machine1)
# vi /etc/xinetd.d/telnet
service telnet
{
        flags           = REUSE
        socket_type     = stream
        wait            = no
        user            = root
        server          = /usr/sbin/in.telnetd
        log_on_failure  += USERID
        disable         = no
        bind            = 127.0.0.1
}
[root@machine1 ~]# /etc/init.d/xinetd restart
Stopping xinetd: [ OK ]
Starting xinetd: [ OK ]Let us verify if we can telnet locally which we can also check using netstat
[root@machine1 ~]# netstat -ntlp | grep 23
tcp        0      0 127.0.0.1:23                0.0.0.0:*        LISTEN      3405/xinetd
So we should be able to telnet our localhost on port 23
# telnet localhost 23
Trying ::1...
telnet: connect to address ::1: Connection refused
Trying 127.0.0.1...
Connected to localhost.
Escape character is '^]'.
CentOS release 6.5 (Final)
Kernel 2.6.32-431.el6.x86_64 on an x86_64
login: deepak
Password: [Password for deepak]
As you see I was able to login using my system's credential locally but what if I try to do the same from remote machine.
Lets try to telnet machine1 from machine 2 on port 23
[root@machine2 ~]# telnet machine1 23
Trying 192.168.1.11...
telnet: connect to address 192.168.1.11: No route to host
telnet: Unable to connect to remote host: No route to host
It didn't worked out too well since we have bind the telnet requests to loopback address
Now lets use ssh to encrypt a tunnel between client and out server
How it works
ssh_client -> ssh_server - to create encrypted tunnels
We will bind to a port like 2323 and forward that through the ssh tunnel to the remote system port 23 all bound to the loopback adapter. So locally we are connecting to the 2323 which a local socket so in case there is a trojan binary that functions as a network sniffer in the network then it will be able to pickup these type of connection but it won't be able to make out the data which goes inside the VPN tunnel.
local(127.0.0.1:2323) -> SSH_TUNNEL -> Remote(127.0.0.1:23)
Syntax:
ssh -L ip_address:2222:destination_system:destination_port user@gatewayWe will leave the ip_address field blank and let ssh determine itself to use the default ip address bound to our ethernet card i.e. eth0 using the gateway of 192.168.1.12
lets take an example. We are going to bound the port 2323 locally to port 23 using a gateway i.e. machine2
# ssh -L 2323:127.0.0.1:23 machine2NOTE: We donot need to be root to perform this action unless the port we are going to use requires root level privilege i.e. (< 1024) also known as well-known ports.
[root@machine1 ~]# ssh -L 2323:127.0.0.1:23 machine2
Last login: Fri Oct  3 05:30:26 2014 from machine1
[root@machine2 ~]#
So we are on machine2. Now lets attempt to connect out telnet client using new port 2323 from machine1
[root@machine1 ~]# telnet localhost 2323
Trying ::1...
Connected to localhost.
Escape character is '^]'.
CentOS release 5.2 (Final)
Kernel 2.6.18-92.el5 on an i686
login: deepak
Password:
Last login: Fri Oct  3 05:31:09 from machine1
[deepak@machine2 ~]$
As yo see I provided my user credential and even though I tried logging into localhost I connected tomachine2. So as long as the ssh session is in place we ran earlier the VPN session will the alive.
configuring open filer in linux
What is Openfiler?
Hardware Requirements
Minimal
Openfiler needs at least a 500 MHz CPU, 256 MB of RAM, 10 GB hard disk space (8 GB for OS installation and 2 GB for swap space), an optical drive (for local installation) and an Ethernet like network interface.
Optimal
A 64 bit processor with 1.6 GHz or more, 2 GB of RAM, 10 GB of hard disk space (8 GB for OS installation plus 2 GB for swap space) and a hardware RAID disk array controller is recommended for optimal performance.
You can get more update on feature of openfile on the wiki page
Let me show you step by step instructions to set up a new machine with openfiler. Now this machine can be a physical machine as well as a virtual machine. Generally in my case I use openfiler for test purposes on my virtual machines.
You can download the iso file for openfiler free of cost from their official website
https://www.openfiler.com/community/download
Follow the below screenshots (Click on the image in case you find it hard to read the texts on the image)
Insert the iso file and boot your machine from the iso and follow the instructions
Click Next to start the installation

Select your preferred Language which for me is US English

Select Yes to format the selected Hard Disk

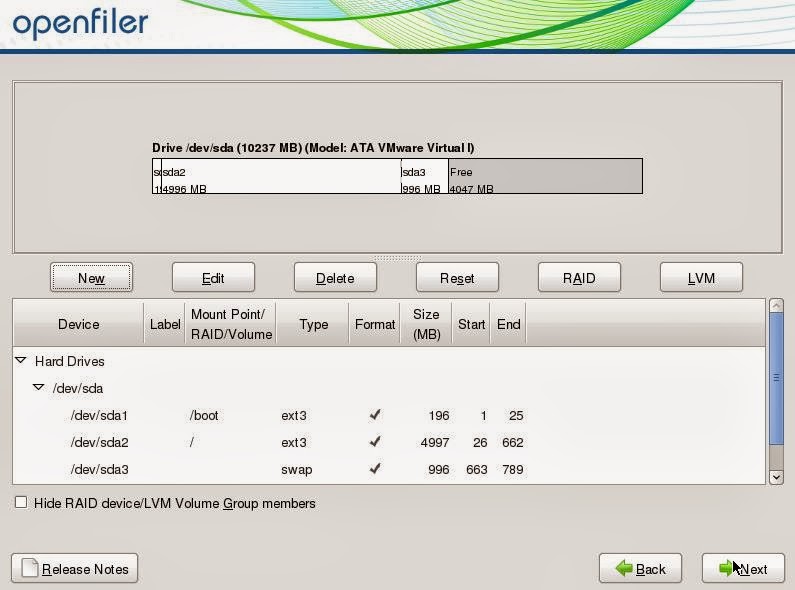
Select "Create custom layout" from the drop down menu as shown below and click on Next

Create a custom layout of your partition system.
NOTE: Make sure that you leave free space which will be used for storage purpose(iSCSI, Fiber, etc..) using openfiler
Select the default primary partition. I most cases it will automatically detect the root partition

Configure your network and provide a proper hostname in the below section.

Select your continent and region for the date and time settings as in my case it is Asia/Kolkatta

Provide a root password for your machine

Click on Next to start the installation process

Once the installation is completed click on Reboot

So once the machine is rebooted you can see the ip address of the machine and the format which you have to use to access openfiler using client machine browser.

Go to the browser and type you machine ip address which for mine is
https://10.10.20.46:446
Now since you are trying to access a https page, you will be prompted for security certificate authentication by the browser as shown below
Click on Proceed anyway

After that you will get the logon page for openfiler
Your default login credentials will be
Username : openfiler
password : password

Subscribe to:
Comments (Atom)