WiFi Internet sharing

WiFi Internet Sharing - one type of wireless Internet sharing
2015/07/17 14:54
WiFi Internet sharing enables device such as a desktop, laptop, smartphone, and video game console connect to the Internet when they are within range of a WiFi network connected to the Internet. WiFi is in factwireless technology whick makes it much easier to apply Internet sharing between multiple computers and people. It's also called WiFi Internet sharing or wireless Internet sharing. No matter sharing a wired Internet connection with devices built-in WiFi wireless NIC or sharing a WiFi wireless Internet connection with other devices with wired NIC, a proxy server is an easy and efficient method.
Three steps only to allpy Wifi Internet Sharing:
1.     Install a proxy server software such as CCProxy on a computer which is already conntected to Internet. When installation finished, CCProxy will work immediately having no use for any manual configurations.
2.     This computer has at least two NICs, one connects to Internet while another connects to other devices via hub, switch, or a wireless device.
3.     Now, make proxy settings for other devices so that they can access Internet via the proxy server you have just built in step1.
To implement WiFi Internet sharing, you also need to make proxy settings for network applications in the client and here's a sample for IE and Firefox -
For Internet Explorer 8.0
Press "Tools" -> "Internet Options" -> "Connections" -> "LAN Settings" -> select "Use a proxy server for your LAN" -> "Advanced", configure as bellow.
Description: IE8
For Firefox 4.0
Press "Tools" -> "Options" -> "Advanced" -> "Network" -> "Connections" -> "Settings" -> "Manual proxy configuration", configure as bellow.
Description: Firefox4


Bypass firewall

 Bypass firewalls, application white lists, secure remote desktops in 20 seconds Zoltan Balazs DEF CON 22, 2014 root@kali:~# whoami Zoltán Balázs root@kali:~# whoami root@kali:~# whoami AV testing AV bypass root@kali:~# whoami OSCP: Occasional Satire Captain Punk CISSP: Certified Interspecie-ial Sheep Shearing Professional CPTS: Certified Pajama Toaster Specialist MCP: Microsoft Certified Psychopath OSWP: Official Sexiest Weasel Popstar CHFI: Chronic Hopeless Flux Incompetent I’m NOT a CEH CyberLympics@2012 CTF 2nd runners up – gula.sh Creator of the Zombie Browser Toolkit https://github.com/Z6543/ZombieBrowserPack Hungary I love hacking How do you hack high security systems? How do you hack high security systems when you are not Tom Cruise? The mission I’m a spy (with low budget) I want access to a hardened secure RDP (remote desktop) server E.g. server contains confidential documents I need persistent C&C access to the RDP server To upload/download files Interactive remote code execution The solution (in an ideal world) Infected workstation Secure remote desktop server 1. Infect client’s desktop 2. Steal RDP password 3. Connect to RDP 4. Drop malware 5. Command and Control 6. Profit The challenges RDP server is not reachable from the Internet Directly … Two factor authentication is used to access the RDP server No access to the token seeds ;) Drive mapping disabled – no direct file copy Restrictive hardware firewall Allows workstation -> server TCP port 3389 IPv4 only Application white list is used on the RDP server M$ Applocker in my case with default policy Firewall, port 3389 allowed only Is this realistic? Similar environment at a client •Had no time to hack it Infected workstation Secure remote desktop server Target Company The Internet Attacker Firewall, port 3389 allowed only “In hacking, there is no such thing as impossible. Only things that are more challenging.” Already achieved I have remote code execution with C&C on a user’s workstation I have access to a test RDP server I know how the files on the server look like, what services are installed This is Spartaaaa post-exploitation Why should you care about this? Red team/pentester • New tools Blue team • New things to look for during log analysis/incident response Policy maker/business • Funny pictures Divide et impera! Divide the problem into smaller pieces and rule them all, one by one 1. drop malware into the RDP server 2. execute any code on RDP server 3. elevate to admin privileges 4. bypass hardware firewall Divide et impera! Divide the problem into smaller pieces and rule them all, one by one 1. drop malware into the RDP server –> new shiny tool 2. execute any code on RDP server –> nothing new here 3. elevate to admin privileges –> nothing new, no 0day for you 4. bypass hardware firewall -> new shiny tool 1. Drop malware into RDP server 1. Drop malware into RDP server Malware waits for the user to connect to RDP server Creates screenshot (or new animation), show in foreground Optionally blocks user keyboard, mouse ~20 seconds Uses the keyboard and the clipboard – simulates user 1. Starts M$ Word on RDP server 2. Drops encoded ASCII payload 3. Creates Macro code 4. Macro writes binary 5. Macro starts binaries Alternative usage of “user simulator” 1. Add directory to be excluded from AV scans use the AV GUI! only if the user has the privileges and no UAC 2. Install new trusted root certification authority and accept warning – and MiTM SSL connections CA pinning does not stop this attack The AV is alive. Nope, Chuck Testa ™ 2. What is Applocker? 2. Execute any code, bypass Applocker „AppLocker can only control VBScript, JScript, .bat files, .cmd files and Windows PowerShell scripts. It does not control all interpreted code that runs within a host process, for example Perl scripts and macros. Applications could contain flags that are passed to functions that signal AppLocker to circumvent the rules and allow another .exe or .dll file to be loaded. The administrator on the local computer can modify the AppLocker policies defined in the local GPO.” Execute any code, bypass Applocker Load DLL with Word Macro! Even shellcode execution is possible! http://blog.didierstevens.com/2008/06/05/bpmtkhow-about-srp-whitelists/ Private Declare PtrSafe Function LoadLibrary Lib "kernel32" Alias "LoadLibraryA" (ByVal lpLibFileName As String) As Long hLibrary = LoadLibrary(outputdir + "\hack_service.dll") 3. Elevate to admin 3. Elevate to admin Why do I need admin? • It is needed for the last phase, hardware firewall bypass Possibilities • Local priv esc zero day for Win 2012 • Exploit unpatched vulnerability • Exploit vulnerable 3rd party program service • Etc. Processes started with admin (or higher) privileges are not restricted by AppLocker! Elevate to admin - Service exploit C:\> accesschk.exe –l mvulnservice.exe [0] ACCESS_ALLOWED_ACE_TYPE: NT AUTHORITY\TERMINAL SERVER USER FILE_APPEND_DATA FILE_EXECUTE FILE_READ_ATTRIBUTES FILE_READ_DATA FILE_READ_EA FILE_WRITE_ATTRIBUTES FILE_WRITE_DATA FILE_WRITE_EA SYNCHRONIZE READ_CONTROLs C:\> sc sdshow myvulnservice D:(A;;CCLCSWRPWPDTLOCRRC;;;SY) (A;;CCDCLCSWRPWPDTLOCRSDRCWDWO;;;BA)(A;;CCLCSWLOCRRCRPWP;;;IU)(A;;CCLCSWLOCRRC;;;SU) Elevate to admin - Service exploit C:\> accesschk.exe –l mvulnservice.exe [0] ACCESS_ALLOWED_ACE_TYPE: NT AUTHORITY\TERMINAL SERVER USER FILE_APPEND_DATA FILE_EXECUTE FILE_READ_ATTRIBUTES FILE_READ_DATA FILE_READ_EA FILE_WRITE_ATTRIBUTES FILE_WRITE_DATA FILE_WRITE_EA SYNCHRONIZE READ_CONTROLs C:\> sc sdshow myvulnservice D:(A;;CCLCSWRPWPDTLOCRRC;;;SY) (A;;CCDCLCSWRPWPDTLOCRSDRCWDWO;;;BA)(A;;CCLCSWLOCRRCRPWP;;;IU)(A;;CCLCSWLOCRRC;;;SU) Allow Service start Service stop Interactively logged on user Quiz Quiz What’s the name of the company which published the first paper about packet filter firewalls in 1988? Quiz What’s the name of the company which published the first paper about packet filter firewalls in 1988? The company developed VAX Quiz What’s the name of the company which published the first paper about packet filter firewalls in 1988? Digital Equipment Corporation 4. Bypass hardware firewall Restrictive firewall • No Bind shell • No Reverse shell • No covert channel • DNS, ICMP, IPv6, UDP, proxy • No shell!!! In a different scenario • TCP socket reuse shell possible (not persistent) • Webshell (lame) possible • But not in this case (no exploit, no webserver) 4. Bypass hardware firewall First (bad) idea After malware dropped, mark every packet to be special • start with magic bytes and let a kernel network filter driver select the packets Problem • Every (hacker) application has to be rewritten, or rerouted through a custom wrapper proxy (both server and client side) Bypass HW firewall – second idea Use TCP source port! • E.g. port 1337 is always special Limitations • NAT from the attacker side • But who cares? - Bypassing hardware firewalls Linux Use code at Kernel level (with root) if ((tcp_source_port === 1337) && (tcp_dest_port === 22)) then: redirect to bind shell on port 31337 iptables -t nat -A PREROUTING -p tcp --dport 22 -- sport 1337 -j REDIRECT --to-ports 31337 Attacker or infected workstation Firewall, port 3389 allowed only Secure remote desktop server Src port 1337 Dst port 3389 Dst port 3389 Dst port 31337 Bypassing hardware firewalls on Windows x64 Installing a kernel driver in Windows x64 is not trivial • Trusted signed driver is needed Thanks to basil for WinDivert project (and Nemea Software Development) • Trusted signed kernel driver already included! • You can interface with the kernel driver Alternatively, patchguard bypass could be used http://www.codeproject.com/Articles/28318/Bypassing- PatchGuard Uroburos rootkit – Bring Your Own Vuln Install root CA first with user simulator ;) How to set TCP source port for meterpreter bind shell (or any program)? Netcat (Nmap build) to da rescue! ncat -kl 4444 -c "ncat -p 1337 RDP.SER.VER.IP 3389" Demo Alternative usage of “hw fw bypass” You have admin on webserver but persistent outbound C&C is blocked Instead of local port forward, use netcat to port forward to other machines in the DMZ Backdoor traffic to hide your communication inside the legit network traffic The solution – as a whole Malware waits for the user to login to RDP with 2FA Create screenshot from user desktop Put screenshot on the screen Disable keyboard/mouse Drop malware by simulating user keyboard events + clipboard for large (ASCII) data transfer Start WORD, create new macro code Bypass application whitelist using DLL loading from Word macro code The solution Escalate privileges to admin (vulnerable service) Install hwfwbypass.exe with kernel driver Drop meterpreter Profit! Demo Demo 2 – as seen by the user Lessons learned for red team You have two new tools for your post exploitation • tool to drop malware into the remote desktop • If you have admin on a Windows server, you can bypass/fool hardware firewalls using my driver Lessons learned for the blue team Every additional layer of security can still be bypassed Restricted remote desktop is a real interface for malware infection Use application/protocol aware (NG) firewall instead of port based ones Can be bypassed ;) Don’t trust your firewall logs blindly Code release now? References http://reqrypt.org/windivert.html http://inputsimulator.codeplex.com/ - modified http://www.blackhat.com/presentations/bh-usa-06/BH- US-06-Tereshkin.pdf http://blog.didierstevens.com/2011/01/24/circumventing- srp-and-applocker-by-design/ http://www.room362.com/blog/2014/01/16/application- whitelist-bypass-using-ieexec-dot-exe http://leastprivilege.blogspot.fr/2013/04/bypass- applocker-by-loading-dlls-from.html?m=1 https://www.mandiant.com/blog/hikit-rootkit-advanced- persistent-attack-techniques-part-2/ one more thing … two more things … User simulator available as Metasploit post module HW FW bypass available as Metasploit post module Hack The Planet! https://github.com/MRGEffitas/Write-into-screen https://github.com/MRGEffitas/hwfwbypass zoltan.balazs@mrg-effitas.com https://hu.linkedin.com/in/zbalazs Twitter – @zh4ck www.slideshare.net/bz98 Greetz to @hekkcamp JumpESPJump.blogspot.com

how to disable bagground process in windows 7

How do I reduce the number of programs that run in the background in Windows?

C

Disabling Background Applications

How should I disable the background applications?
Many applications set themselves up to start automatically when your computer boots. Some processes must run at startup, but many do not require this in order for the application to run properly.
Unnecessary background applications can cause:
  • Slow performance.
  • Errors during the installation.
  • Issues with Audio/Video in the game.
  • Crashes and other errors.
To resolve the issue, we suggest you close all the unnecessary background applications for testing. Use the following instructions to disable the background applications:

Note:

The following procedure is a temporary troubleshooting step used to disable the non-Microsoft services, which may include security programs like antivirus and firewall programs. To revert the changes made follow the steps documented at the end of the article. While the steps provided below are descriptive, we recommend you contact your system administrator before following the steps listed.

For Windows XP/Vista/7

  • Click the Start button and select Run.
  • Type msconfig and click Ok.

If your computer is in Normal Startup do the following:
  • Click the Selective Startup button.
  • Uncheck the Load Startup items (or Load Startup Group items) box.
  • Select the Services tab and check Hide all Microsoft services.
  • Click Disable all.
  • Click Apply and Close.
  • Restart the computer when prompted.
  • Once restarted, if the system configuration window appears, close the window. Select No to restarting if prompted.

If your computer is set for Selective Startup do the following:
  • Click the Startup tab at the top.
  • Make a note of the items that have checkmarks next to them.
  • Select Disable all.
  • Go to the Services tab and check Hide all Microsoft services.
  • Make a note of the services that have checkmarks next to them.
  • Click Disable all.
  • Click Apply and Close.
  • Restart the computer when prompted.
  • Once restarted, if the system configuration window appears, close the window. Select No to restarting if prompted.

If the program is working fine then it can be concluded that some of the background applications running in the system were causing the issue.

To identify the program that is conflicting with the program follow the steps given below:
  1. Click Start, click Run, type msconfig and click Ok.
  2. Click the Startup tab and click Enable all. If the computer was in Selective startup enable the items that correspond to the items noted earlier.
  3. Click the Services tab, check the option Hide all Microsoft Services.
  4. Click Enable all. If the computer was in Selective startup enable the items that correspond to the services noted earlier.
  5. Uncheck one of the services from the list.
  6. Click Apply, click Close and restart the computer when prompted.
  7. Play the game and test the performance.

Conclusions
  • If the issue is resolved, the service disabled above (step 5) is the cause of the issue. To play the game you must disable this software.
  • If the issue is still unresolved then uncheck a different service from the list and repeat steps 1 to 7.

If the issue is still not resolved check for Start up items which may be conflicting with the game.
  1. Click Start, click Run, type msconfig and click Ok.
  2. Click the Services tab and click Enable all. If the computer was in Selective startup enable the items that correspond to the services noted earlier.
  3. Click the Startup tab and click on Enable All. If the computer was in Selective startup enable the items that correspond to the items noted earlier.
  4. Uncheck one of the startup items from the list.
  5. Click Apply, click Close and restart the computer.
  • Play the game and test the performance. If the issue doesn't occur, this confirms that the particular service running on the system is causing issue.
  • If the issue occurs, check the startup item unchecked in the previous attempt.
  • Uncheck another startup item and repeat the steps 1 to 5.

If the above steps do not help to resolve the issue, follow the steps given below to, revert the changes made in your System Configuration Utility (msconfig):
  1. Click Start, click Run, type msconfig and click Ok.
  2. Click the Startup tab and click Enable all. If the computer was in Selective startup enable the items that correspond to the services noted earlier.
  3. Click the Services tab, check the option Hide all Microsoft Services.
  4. Click Enable all or enable the items that correspond to the items noted earlier.
  5. Click Apply, click Close.
  6. Restart the computer when prompted.

For Windows 2000

  1. Hold down the Ctrl and Alt keys on the keyboard.
  2. Briefly press Delete and then release the other keys.
  3. Click the Task Manager button.
  4. Click the Applications tab at the top.
  5. For each item listed in the task list:
    1. Click the item to select it.
    2. Click End Task.
  6. Repeat the above steps until the task list is empty.
  7. Close the Windows Task Manager screen

Create bootable USB drives the easy way

Create bootable USB drives the easy way
[rufus screenshot]
Rufus is a utility that helps format and create bootable USB flash drives, such as USB keys/pendrives, memory sticks, etc.
It can be especially useful for cases where:
  • you need to create USB installation media from bootable ISOs (Windows, Linux, UEFI, etc.)
  • you need to work on a system that doesn't have an OS installed
  • you need to flash a BIOS or other firmware from DOS
  • you want to run a low-level utility
Despite its small size, Rufus provides everything you need!
Oh, and Rufus is fast. For instance it's about twice as fast as UNetbootinUniversal USB Installer orWindows 7 USB download tool, on the creation of a Windows 7 USB installation drive from an ISO. It is also marginally faster on the creation of Linux bootable USB from ISOs. (1)
A non exhaustive list of Rufus supported ISOs is also provided at the bottom of this page. (2)

Download

Last updated 2016.03.22:

Supported Languages:

AzərbaycancaBahasa IndonesiaBahasa MalaysiaБългарскиČeštinaDanskDeutsch
ΕλληνικάEnglishEspañolFrançaisHrvatskiItalianoLatviešuLietuviųMagyarNederlands
NorskPolskiPortuguêsPortuguês do BrasilРусскийRomânăSlovenskySlovenščinaSrpski
SuomiSvenskaTiếng ViệtTürkçeУкраїнська简体中文正體中文日本語한국어ไทย
العربيةفارسی.

System Requirements:

Windows XP or later, 32 or 64 bit doesn't matter. Once downloaded, the application is ready to use.

I will take this opportunity to express my gratitude to the translators who made it possible for Rufus, as well as this webpage, to be translated in various languages. If you find that you can use Rufus in your own language, you should really thank them!

Install Windows 7 from a USB drive the very easy way

Install Windows 7 from a USB drive the very easy way

The fastest way to install windows 7 is from abootable usb drive. You can cut the install time down to around 15 minutes compared with 30-40 via DVD if you use a fast drive.
People still asking me to explain what is the best way to do this as many of the guides online are too complex, or require third party software which doesn’t always work as they supposed to.
With this BootableUSB guide all you need to ensure is that your motherboard supports USB booting, and this is a common feature now for most of the computers.
Today I am going to publish a step by step guide which works perfectly and doesn’t require any additional tools – I have been doing it for some time now to create bootable Windows install drives.
You need to get hold of a fast USB 2.0 flash drive. It doesn’t need to be 32GB or bigger,however, all you need is a 4GB unit. The faster it is, the better.
What you need:
– Windows 7 DVD install disc or ISO image
– USB Drive (4GB+ and as fast as you can get)
– Running Windows Operating system
– Working set of hands and eyes
– A few minutes of your life
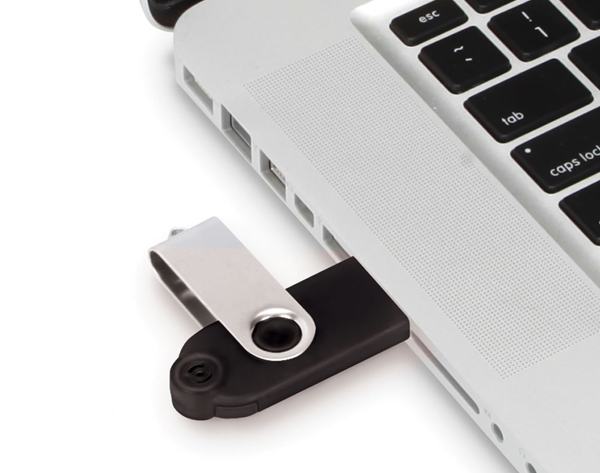
Plug in your USB drive in the USB port:
Usb Drive Plugged
Before going any further, make sure you have removed any important files on your drive to a safe location, what we are about to do next is to erase the entire contents of the drive.
Insert your DVD of Windows 7 into the computer, but don’t start the normal install process.
Open your ‘My Computer’ and make a note of the drive numbers of both the USB drive and the DVD drive with Windows 7 files on it.
Usb And Computer Drives

As you can see from the image above, the DVD drive is drive has letter D assigned and the USB drive is E.
Open the command prompt with admin rights. Type cmd in Start menu search box and hit Shift+Ctrl+Enter.
To keep things really easy, if you see text in upper case, it means this is what you type into the command prompt (you don’t need to type in upper case).
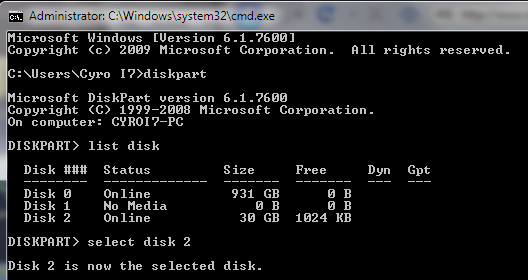
cmd-prompt-usb-bootable

Next type
DISKPART
this loads the diskpart application we need to proceed
Then type
LIST DISK
the image above shows our 32 GB USB drive is listed as DISK 2
so you have to type
SELECT DISK 2 (your USB Drive may have a different number, don’t follow exactly this text it depends on your usb drive)
You will get a successful response “Disk 2 is now the selected disk”
Clean Cmd USB Drive
Next we want to clean the USB drive
Type:
CLEAN
you will get a successful response ‘DiskPart succeeded in cleaning the disk”.
Clean USB Drive

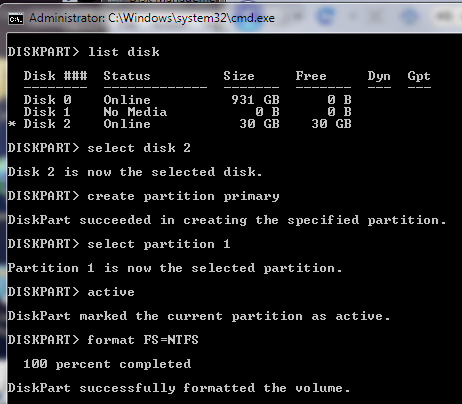
After the drive is cleaned follow the list in the image above (detailed below in list order) – you can also note the successful text responses from the OS as you enter each command.
SELECT DISK 2 (or what number your USB drive has)
CREATE PARTITION PRIMARY
SELECT PARTITION 1
ACTIVE
FORMAT FS=NTFS
Formatting can take a little time depending on the size of the drive, our 32GB unit took about 10 minutes to format - you will see a percentage readout until it is finished.
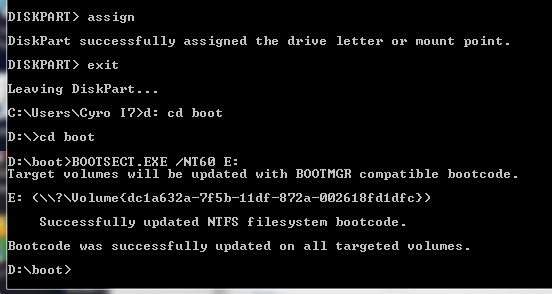
Bootable USB Final Cmd Prompt
Next type:
ASSIGN
EXIT (DISK PART will exit)
Type D: CD BOOT (substitute the “D” if necessary with the letter of your Windows 7 DVD drive)
then key
CD BOOT
then
BOOTSECT.EXE /NT60 E: (substitute the “E” if necessary with the letter of your now ready USB drive) – we are telling the system to create a boot sector file on the USB drive.
Now you can exit the command prompt and copy all the files on the Windows 7 DVD to the USB drive.
Once this step is finished you’ll be ready to boot from this drive, all you need to do is configure your motherboard bios setup to boot first from USB rather than hard drive or optical drive. If you don’t know how to do this, refer to your specific motherboard manual or search the internet.

how to install a printer

Step 1: First, connect the printer to your network by connecting one end of a Cat 5 or 6 cable (which should have come with your printer) to your router and the other end into the network port of your printer. Now, turn your printer on and wait for it to become ready.
connect-extender-to-router-small
Step 2: Next you’ll need to get the IP address of your printer. The IP address is what will let your computer know where to find your printer on the network. All network printersallow you to print a configuration sheet that will list basic information about the printer along with the current network configuration.
For most printers, this involves pressing the Menu button on the printer, going to theInformation option and choosing Print Configuration. Sometimes if there is no display, you just press and hold the Go or Print button down for about 10 seconds and it’ll print the configuration page. You will be looking for the TCP/IP section:
ipprinter
The IP Address is what you’ll need for the next steps. You printer should automatically get an IP address from the DHCP server on your network. At home, the IP should be coming from the wireless router or residential gateway if you have one that acts as a cable modem plus router.
Step 3: The last step is to add the printer to your computer. Click on Start, then Printers and Faxes.
printers and faxes
If you don’t see this in your Start Menu, you can go to Start, Control Panel and then click on Printers and Faxes there. Click Add Printer from the task pane on the left.
add a printer
The Add Printer wizard will begin, so click Next to get started. On the next screen you’ll be asked whether your printer is a local printer or a network printer. These options are confusing because a network printer is actually referring either a printer connected to another computer or a printer on a print server. Our printer is a stand-alone printer and so you must select Local printer attached to this computer and make sure that youuncheck the box for automatically detecting the printer.
local printer add
Click Next and you’ll be asked to select the printer port. Since our printer is a network printer with a IP address, we need to select the Create a new port option and chooseStandard TCP/IP Port.
standard tcpip port
Click Next and you’ll get another wizard to add a TCP/IP printer port. On the main wizard screen click Next. In the first text box, Printer Name or IP Address, enter the IP address from the printer configuration sheet you printer earlier.
add tcpip port
Click Next and depending on the printer you have, you may get one more dialogs before the end of the wizard. If the network card for the printer cannot be identified, the wizard will ask you to choose the card type. You can leave the default of “Generic Network Card” and click Next.
generic network card
Click Next and click Finish. You will then continue on with the Add Printer wizard and you’ll need to either choose the printer from the list of manufacturers or click Have Disk and insert your printer driver cd in the computer.
install printer driver
Click Next and enter a name for your printer and click the Yes radio button if you would like the printer to be your default printer.
name printer dialog
Click Next and you’ll be asked whether you want to share the printer or not. Click No because anyone else who wants to connect will be able to do so following the same steps. In later versions of Windows XP, the printer sharing dialog has been removed. Click Next and click Yes to print a test page and make sure that the computer and printer can communicate!
print test page
Click Next and then click Finish! The new printer will appear in your Printers and Faxes screen and you’re ready to print to your network printer in Windows XP!